Ruby on Rails Authentication and Authorisation Tutorial
Ruby on Rails Authentication and Authorisation with EMail confirmation user activation.
What you will learn here:
- How to create authentication and authorisation in Ruby on Rails.
- Furthermore, when a user signs up he is sent an email to which he must respond to activate his account.
- The IP address from which the user signs up is recorded. By default his creation date is also recorded.
- Use a globally unique ID for users, not the default integers starting at 1. I did this because the verification link in the email contains the user id. A mischievous user can reconstruct the link with a user id smaller than his, if the default integers were used, to see what mischief he can practise. Also, of course, when it comes to users/show it's easy to use integers to page through the users. A GUID does not allow either of these two scenarios.
Install Ruby and Rails
To start off with, install Ruby and Rails if you don't already have them.
I'm assuming you're on Linux. If you're on Windows, why? So go to Download Ruby Page
and follow the instructions to install Ruby. To make this generic over all distributions, I'll go with the compile and install from code instructions. Wherever you see $ sudo, if you don't know what that means, sign in as superuser root and do whatever sudo is supposed to do.
Make sure you have the necessary prerequisites. If you're on Debian or one of its children (Ubuntu, Mepis, etc.) do
$ sudo apt-get install build-essential libssl-dev libreadline5-dev zlib1g-dev
If not, download the libraries indicated above. The build-essential package is a list of what Debian needs to build from code. It consists of 23 packages like, bash, tar, etc. on my computer. You will need something like gcc to compile with. Use
$ gcc -v
to see if you have it. On my machine version 4.3.2 is installed.
This will get you the latest stable Ruby package:
$ wget ftp://ftp.ruby-lang.org/pub/ruby/stable-snapshot.tar.gz
Now follow the instructions on the download Ruby page. I'll repeat them here for completeness sake.
First, $ tar xzf stable-snapshot.tar.gz
Then $ cd ruby/
$ ./configure
$ make
$ sudo make install
Now see what was installed.
$ ruby -v
On my machine I get ruby 1.8.8dev (2009-06-19) [x86_64-linux]
If you have installed ruby 1.9.1 or above, you apparently don't need Ruby Gems, as it comes with the Ruby installation. However, if you need Ruby Gems, go to Ruby Gems and download the latest Ruby Gems. Note this is not the link or version of Ruby Gems on the Ruby on Rails Wiki page. Now do the following:
$ tar xzvf rubygems-1.x.x.tgz (mine was 1.3.4)
$ cd rubygems-1.x.x
$ sudo ruby setup.rb
The Wiki page talks of creating symbolic links in /usr/bin. On my system (Debian Lenny) everything was installed in /usr/local and executables, not links, placed in /usr/local/bin. You may want to have a look and see where everything is installed and create symbolic links as explained on the Wiki page, if needed.
Now install Rails:
$ sudo gem install rails
To see which rails was installed, do
$ rails -v
I get Rails 2.3.2
The Database and its Ruby Connector
You will need a database to follow along. Install either MySQL or PostgreSQL using your distribution package installer. Then set up your database so you can log into it and create databases, tables, populate the tables, etc. What this means is that you should create users (at least one) in your database and give him certain permissions. If you don't know how to do this, go to the website of the database you installed and follow the instructions. See that you install the package that connects your database to Ruby:
$ sudo gem install mysql I installed postgresql here.
Have a look at your database.yml file once it is generated. It is here that you specify the details of the database the application has to connect to. We will get there very soon.
The Application
We will need the following functionality:
- Create a new user
- Send e-mail to the new user
- New user uses the e-mail to activate his account or delete himself from the database
- New user can now log in
- Once logged in the new user can change his password
- User can log out
- User can request a new password be sent to him using his e-mail address
For all the above we will need the following forms:
- A sign up form
- A log in form
- A change password form
- A form to request a new password
Logging out will just be an action link.
To start your application, open a terminal window (Windows users, a command window) and migrate to where you want to build this project. Say /home/yourname/projects/ruby. Now enter
$ rails authenticate -d postgresql
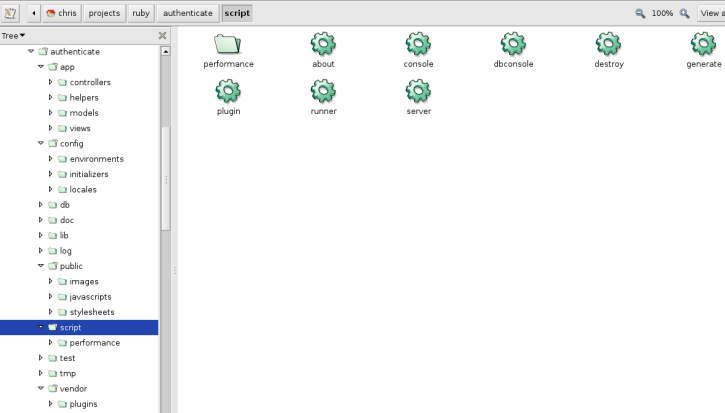
If you are going to use Mysql enter mysql rather than postgresql. Things will scroll by on the term window and you will end up with a directory structure like this:
Now create your databases. For me it was:
$ createdb authenticate_development
$ createdb authenticate_production
$ createdb authenticate_test
Of course, if you don't use PostgreSQL or used a different project name, things will be different.
Now open authenticate/config/database.yml in a text editor. This is what my database.yml looks like. Fill in the user name and password in the relevant places. You will see provision is made to connect to the database using TCP/IP. Apparently this is a must in Windows. If you're on Windows, uncomment those lines.
Your model
Model is just what a class representing a database table is called. In Ruby there is no mapping between the class and the database table, like in Java where every column in the table is represented by a member of the class. Also, in Ruby the model class can contain methods used to do things on one row in the table - in this case a certain user. These things can be logging in this certain user, changing his password, etc. In Java these methods will be in a different class, an action class or session bean. Our model here is going to be the class User.rb which will be represented by a table called users.
You may remember that our users are not going to have the default integer ID generated by Rails. So, let's install the GUID plugin which will generate 22 char guids for our user primary keys. Download guid.zip and unzip into authenticate/vendor/plugins/guid/ Inside guid you should have an init.rb and README.TXT files and a lib directory.
Now a short detour; the GUID plugin uses the computer's mac address, obtained by calling /sbin/ifconfig, to generate the guid. On one of the commercial hosts, Dreamhost, one is not allowed to call /sbin/ifconfig and key generation fails. The fix is simple: migrate into the authenticate/vendor/plugins/guid/lib directory and open uuidtools.rb in a text editor. Near the top (line 106 for me) you will find @@mac_address = nil. Change that to @@mac_address = "12:23:23:45:78:34" or something similar in that format. You can obtain your computer's mac address by calling /sbin/ifconfig and use that. Of course, if you don't have the problem calling /sbin/ifconfig you don't have to do any of this.
Now, let's create our model:
$ cd authenticate  #All the commands are going to be issued from this directory, from now on.
$ ruby script/generate model user login:string clearance:integer name:string surname:string email:string ip_address:string salt:string hashed_password:string activated:boolean
exists  app/models/
exists  test/unit/
exists  test/fixtures/
create  app/models/user.rb
create  test/unit/user_test.rb
create  test/fixtures/users.yml
create  db/migrate
create  db/migrate/20090707125413_create_users.rb
Open authenticate/db/migrate/date_create_users.rb in a text editor. First of all (1) we have to tell Rake not to create the default, auto incrementing, integer ID primary key. Then (2) we have to tell it to create an ID column of data type varchar(22). Next (3) we have to tell it to set this column as the primary key. The areas to change the generated file are all marked in the code below.
class CreateUsers < ActiveRecord::Migration
def self.up
create_table :users, :id => false do |t| 		(1)
t.string :id, :limit => 22			  		(2)
t.string :login, :limit => 15
t.integer :clearance
t.string :name
t.string :surname
t.string :email
t.string :ip_address
t.string :salt
t.string :hashed_password
t.boolean :activated

t.timestamps
end
execute "ALTER TABLE users ADD PRIMARY KEY (id)"	(3)
end

def self.down
drop_table :users
end
end
Now we're going to create our table:
$ rake db:migrate
(in /home/chris/projects/ruby/authenticate)
==  CreateUsers: migrating ====================================================
-- create_table(:users, {:id=>false})
-> 0.0048s
-- execute("ALTER TABLE users ADD PRIMARY KEY (id)")
NOTICE:  ALTER TABLE / ADD PRIMARY KEY will create implicit index "users_pkey" for table "users"
-> 0.0283s
==  CreateUsers: migrated (0.0334s) ===========================================
If you are not using PostgreSQL, your output may not look exactly the same and you will need to log into your database in a different way.
Let's see what happened in the database and which tables were generated and how they look:
$ psql authenticate_development
Welcome to psql 8.3.7, the PostgreSQL interactive terminal.

authenticate_development=# \dt
public | schema_migrations | table | chris
public | users			 | table | chris
We see two tables both belonging to me. We are interested in users.
authenticate_development=# \d users
id			  | character varying(22)	   | not null
login		   | character varying(15)	   |
clearance	   | integer					 |
name			| character varying(255)	  |
surname		 | character varying(255)	  |
email		   | character varying(255)	  |
ip_address	  | character varying(255)	  |
salt			| character varying(255)	  |
hashed_password | character varying(255)	  |
activated	   | boolean					 |
created_at	  | timestamp without time zone |
updated_at	  | timestamp without time zone |
This is about what we wanted. You can now log out of your database.
We want to check that the e-mail address the user enters confirms to the format of an e-mail address. Get rfc822.rb and copy and paste that to a file with the same name in your project's lib directory. Personally, I would also like the people signing up not to use a web mail host, like hotmail, gmail, etc. Anyone can create an account like that and use it to activate his account with your site. Therefore, I created a small ruby file, consisting of one method,to weed out some of the more common web mail hosts. Open web_mail_hosts.rb and copy and paste, or right click and save it to a file with the same name in your project's lib directory.
You remember I said the model class will do some work on itself. Below is what the code should look like. First of all we tell it to use the plugin to create globally unique indentifiers and the rfc822 class to check the format of e-mail addresses.
class User < ActiveRecord::Base
include RFC822
usesguid

validates_length_of :login, :within => 5..40
validates_length_of :password, :within => 5..40
validates_presence_of :login, :email, :password, :password_confirmation, :name, :surname
validates_uniqueness_of :login, :email
validates_confirmation_of :password
validates_format_of :email, :with => EmailAddress

attr_protected :id, :salt

attr_accessor :password, :password_confirmation

def self.authenticate(login, pass)
u=find(:first, :conditions=>["login = ?", login])
return nil if u.nil?
return u if User.encrypt(pass, u.salt)==u.hashed_password
nil
end

def password=(pass)
@password=pass
self.salt = User.random_string(10) if !self.salt?
self.hashed_password = User.encrypt(@password, self.salt)
end

def send_new_password
new_pass = User.random_string(10)
self.password = self.password_confirmation = new_pass
self.save
Notifications.deliver_forgot_password(self.email, self.login, new_pass)
end

def send_activate
Notifications.deliver_activate(self.email, self.name, self.surname, self.id)
end

def activate?
update_attribute('activated', true)
if self.activated
  return true
else
  return false
end
end

protected

def self.encrypt(pass, salt)
Digest::SHA1.hexdigest(pass+salt)
end

def self.random_string(len)
#generat a random password consisting of strings and digits
chars = ("a".."z").to_a + ("A".."Z").to_a + ("0".."9").to_a
newpass = ""
1.upto(len) { |i| newpass << chars[rand(chars.size-1)] }
return newpass
end
end
You will see that this class contains methods to authenticate itself, set a password, send a new password to the user, activate itself, encrypt its password, etc.
Your controllers
chris@oberon:~/projects/ruby/authenticate$ ruby script/generate controller users new delete activate new_password forgot_password
exists  app/controllers/
exists  app/helpers/
create  app/views/users
exists  test/functional/
create  test/unit/helpers/
create  app/controllers/users_controller.rb
create  test/functional/users_controller_test.rb
create  app/helpers/users_helper.rb
create  test/unit/helpers/users_helper_test.rb
create  app/views/users/new.html.erb
create  app/views/users/delete.html.erb
create  app/views/users/activate.html.erb
create  app/views/users/new_password.html.erb
create  app/views/users/forgot_password.html.erb
As you can see, the above created a controller, users_controller.rb of the class UsersController, in the app/controllers directory. This controller has the five methods, new, delete, activate, new_password and forgot_password which we specified when creating this controller. We also have a view for each of the five methods in app/views/users.
Let's also create a controller to handle logins.
chris@oberon:~/projects/ruby/authenticate$ ruby script/generate controller logins login logout logged_in logged_out
exists  app/controllers/
exists  app/helpers/
exists  app/views/logins
exists  test/functional/
exists  test/unit/helpers/
create  app/controllers/logins_controller.rb
create  test/functional/logins_controller_test.rb
create  app/helpers/logins_helper.rb
create  test/unit/helpers/logins_helper_test.rb
create  app/views/logins/login.html.erb
create  app/views/logins/logout.html.erb
create  app/views/logins/logged_in.html.erb
create  app/views/logins/logged_out.html.erb
In this controller we are just interested in logging in and logging out. The logged_in and logged_out methods are going to be empty. We are just interested in their views for the sake of this tutorial.
You will also find a controller, application_controller.rb, with the two controllers we just created. Rails did this when we created the project. Code in application_controller.rb is accessible from any controller, and if we indicate a method is a helper_method it is also accessible from any view. We will be coming back to this shortly.
OK, so what's first? When we land on this site, we want to be able to sign up. That's to say, create a new user. So, let's go to the user controller. First of all, we set up a filter, which is not written yet, to require that a user be logged in before he can change his password. Then we "import" the web_mail_hosts.rb file which lives in authenticate/lib. Then we create the new method. This is what it looks like:
class UsersController < ApplicationController
before_filter :login_required, :only=> [:new_password, :delete]
require 'web_mail_hosts'

def new
if request.post?
	@user = User.new(params[:user])
	@user.ip_address=ip_address
	@user.clearance = 0;
	if not_wanted?(@user.email.to_s)  # user submitted an email address from a web mail host
		flash[:warning] = "Your email address appears to be web based"
		render  :action => 'new'
	elsif @user.save
		@user.send_activate
		flash[:notice] = "Signup successful. Activation e-mail has been sent"
		redirect_to  :controller => 'logins', :action => 'login'
	else
		flash[:warning] = "Please try again - problems saving your details to the database"
		render :action => 'new'
	end
end
end

def delete
end

def activate
end

def new_password
end

def forgot_password
end

end
The test for form data submission (if request.post?) is done so that if this method is called in any way but from a form, only its view will be displayed without executing any of its code.
We have called at least two methods, ip_address and clearance that are not implemented yet. We may want to call these methods, as well as some others, from more than one controller and maybe even from some views. So we will implement them in the already mentioned application_controller.rb. This is what that class looks like:
# Filters added to this controller apply to all controllers in the application.
# Likewise, all the methods added will be available for all controllers.

class ApplicationController < ActionController::Base
helper :all # include all helpers, all the time

before_filter :fetch_logged_in_user

protect_from_forgery # See ActionController::RequestForgeryProtection for details

protected
def fetch_logged_in_user
  return unless session[:user_id]
  @current_user = User.find_by_id(session[:user_id])
end

def logged_in?
! @current_user.nil?
end
helper_method :logged_in?

def clearance
if logged_in?
  return @current_user.clearance
else
  return nil
end
end
helper_method :clearance

def login_required
return true if logged_in?
session[:return_to] = request.request_uri
flash[:notice]="You have to log in!"
redirect_to :controller => 'logins', :action => 'login' and return false
end

def ip_address
return request.remote_ip
end

# Scrub sensitive parameters from your log
# filter_parameter_logging :password
end
Your views
Or rather, your views this far. To start off with, we will need the main layout view that all other views are going to use as a template, application.html.erb. This file is in authenticate/app/view/layouts. This is what it should look like:
<!DOCTYPE html PUBLIC "-//W3C//DTD XHTML 1.0 Strict//EN" "https://www.w3.org/TR/xhtml1/DTD/xhtml1-strict.dtd">
<html xmlns="https://www.w3.org/1999/xhtml" xml:lang="en" lang="en">
<head>
<meta http-equiv="Content-type" content="text/html; charset=utf-8" />
<title>Authenticate Application</title>
<%= stylesheet_link_tag 'black' %>
<%= javascript_include_tag :defaults %>

</head>
<body>
<div id="shell">
<div id="toplinks">
<% if !logged_in? %>
	  <%= link_to 'Sign Up', '/users/new' %>
<% end %>
<% if logged_in? %>
	  <%= link_to 'Change Password', '/users/change_password' %>
<% end %>
</div>
<div id="login_logout">
	<% if @current_user %>
		Logged in as: <%= @current_user.login %>
		<em><%= link_to "(Logout)", '/logins/logout' %></em>
	<% else %>
		<em>Not logged in.</em>
		<%= link_to 'Login', '/logins/login' %>
	<% end %>
</div>
<div class="clear"></div>
<% unless flash[:notice].blank? %>
<div id="notification"><%= flash[:notice] %></div>
<% end %>
<% unless flash[:warning].blank? %>
<div id="warning"><%= flash[:warning] %></div>
<% end %>
<%= yield %>
</div>
</body>
</html>
You can download the stylesheet, which must be saved in authenticate/public/stylesheets, here and the navigation division background image, which must be saved in authenticate/public/images, here.
The next file is authenticate/app/views/users/new.html.erb. It should look like this:
<% if !logged_in? %>
<h2>Sign up</h2>
<%= error_messages_for 'user' %>
<p>Please fill in all fields</p>
<p>Your user name and password must be between 5 and 40 alphanumeric characters.</p>
<p>Please do not submit web mail addresses, like <b>hotmail, gmail</b> and others. Use your e-mail address with your ISP.</p>
<p><strong>Your email address must be valid.</strong> We will send you an email which you must use to activate your account.
You will not be able to log in or upload announcements until your account is activated.</p>
<% form_for(:user, @user, :url => {:action=> 'new'}) do |f| %>
<fieldset>
<legend>New User Data</legend>
<p>
<label for='user_login'>Username</label><br/>
<%= f.text_field :login, :size => 40 %>
</p>
<p>
<label for='user_name'>First Name</label><br/>
<%= f.text_field :name, :size => 40 %>
</p>
<p>
<label for='user_surname'>Surname or Last Name</label><br/>
<%= f.text_field :surname, :size => 40 %>
</p>
<p>
<label for='user_password'>Password</label><br/>
<%= f.password_field :password, :size => 40 %>
</p>
<p>
<label for='user_password_confirmation'>Password Confirmation</label><br/>
<%= f.password_field :password_confirmation, :size => 40 %><br/>
</p>
<p>
<label for='user_email'>Email</label><br/>
<%= f.text_field :email,  :size => 40 %><br/>
</p>
<%= submit_tag 'Signup' %>
</fieldset>
<% end %>
<% else %>
<h2>You are already logged in and therefore signed up</h2>
<% end %>
Now you are nearly ready to see the first fruits of your handiwork. All we have to do is make sure you will be presented with the sign-up page when requesting the url. Open authenticate/config/routes.rb and under # map.root :controller => "welcome" add the line map.root :controller => "users", :action => "new" Now you will be taken to the sign up form as soon as your application opens.
In the authenticate directory type ruby script/server into a terminal window and watch the server start up. Now fire up your browser and type http://localhost:3000/ into the address field. You should be rewarded with the following gratifying sight:

All the code to create a new user is already in place, but the code for sending an activation e-mail still needs to be done. So, let's do it.
Your mailers
You will want to send out two kinds of e-mail messages:
- Messages asking the user who signed up to activate.
- Messages supplying a user who lost his password with a newly generated password
chris@oberon:~/projects/ruby/authenticate$ ruby script/generate mailer notifications forgot_password activate
exists  app/models/
create  app/views/notifications
exists  test/unit/
create  test/fixtures/notifications
create  app/models/notifications.rb
create  test/unit/notifications_test.rb
create  app/views/notifications/forgot_password.erb
create  test/fixtures/notifications/forgot_password
create  app/views/notifications/activate.erb
create  test/fixtures/notifications/activate
As you can see, in authenticate/app/models, notifications.rb was generated and in authenticate/app/views/notifications, forgot_password.erb and activate.erb were generated. These two views are templates of the e-mail that your mailer, notifications.rb is going to use. Note the .erb extension of these templates as opposed the .html.erb extensions of the other views.
Without going into too much detail, this is what activate.erb looks like:
<html>
<head>
<title>Mail from Authenticate</title>
</head>
<body>
<center>
<table style="width: 555px; margin: 10px auto; border: 1px black solid;">
<tr><td style="background: #dfdfdf; text-align: center;"><h2 style="margin: 8px auto 8px auto;">Activate Your Authenticate Account</h2></td></tr>
<tr>
<td style="text-align: left; padding: 5px 10px;">
  <p>Welcome to <strong>Authenticate</strong>, <strong><%= @name %> <%= @surname %></strong></p>
  <p><strong>Authenticate</strong> received a sign-up request using <%= @email %>.  If it is indeed from you
  and you wish to activate your account, click <a href="http://localhost:3000/users/activate?id=<%= @id %>">here.</a></p>
  <p>Should you wish to be completely removed from our database, click
  <a href="http://localhost:3000/users/delete?id=<%= @id %>">here.</a></p>
</td>
</tr>
</table>
</center>
</body>
</html>
You will notice that this is a simple html layout for an e-mail. Everything is in the code, no images or style sheets to be downloaded from elsewhere. For e-mails a simple table layout is best.
And this is what forgot_password.erb looks like:
<html>
<head>
<title>Mail from Authenticate</title>
</head>
<body>
<center>
<table style="width: 555px; margin: 10px auto; border: 1px black solid;">
<tr><td style="background: #dfdfdf; text-align: center;"><h2 style="margin: 8px auto 8px auto;">Your Lost Password</h2></td></tr>
<tr>
<td style="text-align: left; padding: 5px 10px;">
  <p><strong>Authenticate</strong> received a request for a password replacement from your e-mail address.  As your password is stored in a
  hashed format in our database, we cannot tell you what your password was.  We have generated a new, random password for you.  Please note
  that it is case sensitive.</p>
  <p>Your username is <em><%= @login %></em>. Your new password is <em><%= @pass %></em>. Please login and change it to something more memorable.</p>
  <p><a href="http://localhost:3000/logins/login">Click Here to Log In</a>
</td>
</tr>
</table>
</center>
</body>
</html>
Much the same goes for forgot_password.erb as for activate.erb.
app/models/notifications.rb looks like this:
class Notifications < ActionMailer::Base

def forgot_password(to, login, pass, sent_at = Time.now)
@subject	= "Your lost password"
@body['login']=login
@body['pass']=pass
@recipients = to
@from = 'you@your_isp.com'
@sent_on = sent_at
@content_type = "text/html"
end

def activate(to, name, surname, id, sent_at = Time.now)
@subject	= 'Account activation at Authenticate'
@body['name']=name
@body['surname']=surname
@body['email']=to
@body['id']=id
@recipients = to
@from = 'you@your_isp.com'
@sent_on = sent_at
@content_type = "text/html"
end
end
It is clear that things like @body['login'] get tranferred to the templates, in this case to <%= @login %>.
Configuring your SMTP server
I have Exim installed on my Debian box. My ISP would not allow me to send mail using another SMTP server, but theirs. Also, all mail going out through them must have their domain and the From: field. Therefore my From address must be my email address with them. That would of course prevent me from sending 2 million spam messages apparently originating from elsewhere through their network. So I set up Exim to use a smart host SMTP server for messages going out of the local network. This smart SMTP server is of course my ISP's SMTP server. I fed its details into Exim and use Exim as if it is the SMTP server. You can try and use the SMTP server of your ISP directly. In that case type in mail.your_isp.com or whatever is the address of your ISP's SMTP server where you see localhost in the example.
Here is what the end of my authenticate/config/environment.rb file looks like:
# The default locale is :en and all translations from config/locales/*.rb,yml are auto loaded.
# config.i18n.load_path += Dir[Rails.root.join('my', 'locales', '*.{rb,yml}')]
# config.i18n.default_locale = :de
#ActionMailer settings
config.action_mailer.delivery_method = :smtp
config.action_mailer.smtp_settings = {
:address			=> 'localhost',
:port			=> 25,
:domain			=> 'your_isp.com'
}
config.action_mailer.raise_delivery_errors = true
config.action_mailer.perform_deliveries = true
config.action_mailer.default_charset = 'utf-8'
end
Finally...
Fire up your server by typing ruby script/server into your term window, open your browser and go to http://localhost:3000. You will see the sign up form. Fill it in and
click the button. You should see the following:
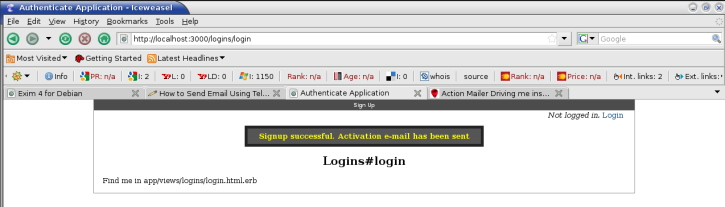
If sending the e-mail worked, you should find an e-mail looking like this in your inbox:

However, before you can click any of the links we have to implement the methods in your controller handling those links. So, let's go to authenticate/apps/controllers/users_controller.rb and complete the four remaining methods. This is what they should look like:
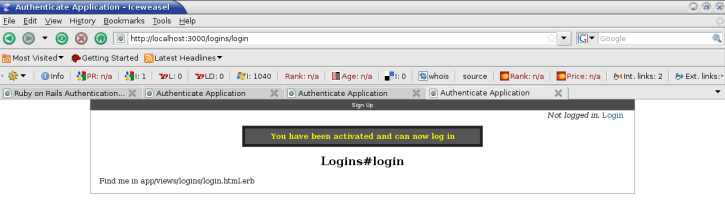
def delete
if request.get?
	u=User.find_by_id(session[:user_id].to_s)
	if u == nil
		flash[:warning] = "You must be logged in to delete yourself"
		redirect_to :controller => 'logins', :action => 'login'
	else
		session[:user_id] = nil #log out
		u.destroy
		flash[:notice] = "You were deleted from the database and logged out"
		redirect_to :controller => 'logins', :action => 'logged_out'
	end
end
end

def activate
if request.get?
	user=User.find_by_id(params[:id])
	puts user.name + ' ' + user.surname
	if user.activate?
		flash[:notice]="You have been activated and can now log in"
		redirect_to :controller => 'logins', :action => 'login'
	else
		flash[:warning]="We could not activate you.  Send us email."
		redirect_to :controller => 'logins', :action => 'login'
	end
end
end

def new_password
if request.post?
	@user=User.find_by_id(session[:user_id].to_s)
	if @user.update_attributes(:password=>params[:password], :password_confirmation => params[:password_confirmation])
		flash[:notice]="Password Changed"
		redirect_to :controller => 'logins', :action => 'logged_in'
	end
end
end

def forgot_password
if request.post?
	u= User.find_by_email(params[:email])
	if u
		if u.send_new_password
			flash[:notice]  = "A new password has been sent by email."
			redirect_to  :controller => 'logins',:action => 'login'
		else
			flash[:warning]  = "EMail address OK, but couldn't send password"
			render :action => 'forgot_password'
		end
	else
		flash[:warning] = "No such email address on record"
		render :action => 'forgot_password'
	end
end
end
If you now click on the link to activate you in your e-mail, you will be rewarded with the following page in your browser:
Login functionality
It is very obvious that we haven't done the login page yet. Go to authenticate/app/views/logins/login.html.erb and complete it to look like:
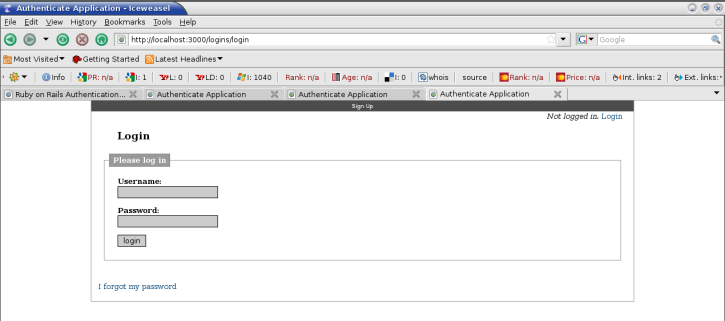
<h2>Login</h2>
<% form_tag '/logins/login' do %>
<fieldset>
<legend>Please log in</legend>
<p>
<label>Username:</label><br />
<%= text_field_tag :login %>
</p>
<p>
<label>Password:</label><br />
<%= password_field_tag :password %>
</p>
<p><%= submit_tag 'login' %></p>
</fieldset>
<% end %>
<br />

   <%= link_to 'I forgot my password', :controller => 'users', :action => 'forgot_password' %><br /><br />
If you now refresh the page you will get the real login page:
All that remains is your logins_controller.rb It should look like below:
class LoginsController < ApplicationController

def new
end

def login
	@current_user = User.authenticate(params[:login], params[:password])
	if @current_user
		if @current_user.activated
			session[:user_id] = @current_user.id
			flash[:notice]  = "Login successful"
			if session[:return_to]
				redirect_to session[:return_to]
				session[:return_to] = nil
			else
				redirect_to :action => 'logged_in'
			end
		else
			flash[:warning]="Your account is not activated"
			render :action => 'login'
		end
	else
		flash[:warning] = "No such user"
		render :action => 'login'
	end
end

def logout
	@current_user = session[:user_id] = nil
	flash[:notice] = 'Logged out'
	redirect_to :action => 'logged_out'
end

def logged_in
end

def logged_out
end

end
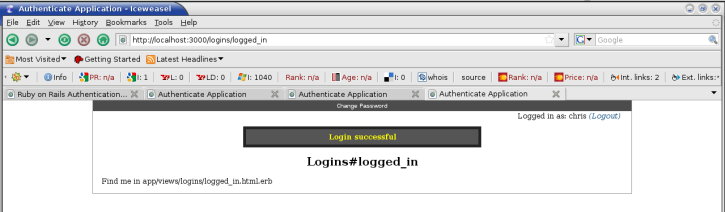
If you know fill in your user name and password and click the login button you will be logged in:
Clicking the logout link will now log you out.
The remaining methods are now just more of the same. Changing your password or deleteting yourself once logged in is covered in the code. Similarly, requesting that a new password be mailed to you is very similar to signing up. There are a few views you don't have the code for, but they are all included in the code which you can download.
If you find what you learned on this page useful, please use the social media widgets at the bottom and pin, tweet, plus-one or whatever this page.
The functionality you have learned here is very useful. This is it. Write a note to let us know what you think of all this.
Use and empty line to separate paragraphs in the "Comment" text area.
Links and html markup are not allowed.